Cómo crear un Pay Button con BTCPAY Server y Mynode sin tienda tipo Woocommerce
En este artículo comento mis experimentos con BTCPAY Server integrado en Mynode, con el objeto de poder crear de forma sencilla un botón de pago para integrar en nuestra página web, de forma autónoma, sin necesidad de tener que contar con servicios de terceros, contra nuestro propio nodo de bitcoin.
INTEGRACIÓN CON WOOCOMMERCE. ALGO NO APTO PARA PRINCIPIANTES
BTCPAY se anuncia como algo fácil y accesible para cualquiera que quiera abrir un comercio aceptando bitcoins sin necesidad de recurrir a terceros. Al día de hoy este objetivo es ciertamente complejo, incluso para aquellos que tienen conocimientos con nivel de experto (https://www.sosthene.net/btcpay-bilan/). Por lo que he visto, el usuario medio está necesariamente abocado a, o bien gastarse el dinero en una solución de hosting tipo Lunanode, o en el mejor de los casos, tener que recurrir a un servicio de DDNS como no-ip.com (gratuito) y recurrir a amigos o profesionales con conocimiento elevados en la materia. Otra opción muy recomendable sería usar los servicios de bitcoinheiros. Para los interesados en esta iniciativa recomiendo la reciente charla liderada por Lunaticoin, accesible en youtube.
Tras muchos intentos y horas de estudio, personalmente creo que me quedé atascado en el paso 3 de este tutorial (https://docs.btcpayserver.org/DynamicDNS/, Configure your BTCPay docker install to provide HTTPS certificates) por el que hay que ir a la línea de comandos y las instrucciones son simplemente que te conectes a tu “instancia” y ejecutes unos comandos, sin más explicaciones sobre, por ejemplo, cómo acceder a la “instancia”. Si los dos pasos anteriores se pueden hacer desde la interfaz gráfica, no entiendo por qué no han hecho lo mismo con este tercer paso. Igual estoy diciendo una tontería y realmente hay que hacerlo así, pero creo que esto debería mejorarse.
Para acceder por ssh a mynode, creo que lo más operativo es hacerlo en la página de “settings”
Imagen 1
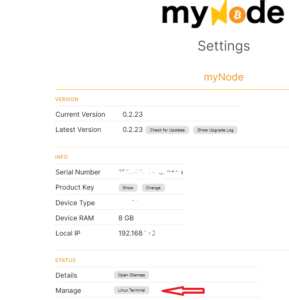
Pero ahí se accede como admin, no como root y según se indica en el panel de control de BTCPAY parece que habría que acceder como root
Imagen 2
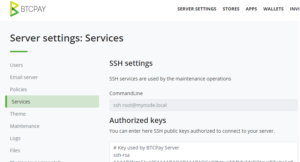
Si la cosa se deja así, al intentar el emparejamiento desde Woocommerce (por cierto hay que poner el dominio virtual que tengamos seguido de “:49392”, el puerto de BTCPAY) nos sale un mensaje diciendo que hay que acceder a través de https o de TOR, sin que haya instrucciones sobre cómo acceder por TOR.
Imagen 3
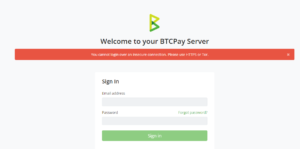
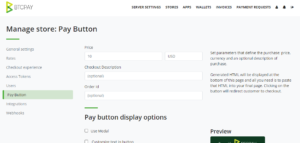
En fin… Después de darme por vencido en mi intento de integrar BTCPAY con Woocomerce, empecé a pensar en alguna otra opción para, por lo menos, usar el “Pay button” que se puede configurar una vez que generamos una tienda en BTCPAY:
Imagen 4
PLANTEAMIENTO SOLUCIÓN ALTERNATIVA
Como decimos, la idea era crear un botón de pago con bitcoins sin necesidad de desarrollar y emparejar con nuestro servidor de BTCPAY una tienda con Woocommerce o similar, y todo ello, como supuestamente pretende conseguir BTCPAY, usando medios propios sin tener que recurrir a nodos o soluciones de botones de pago de terceros que, entre otras cosas, llevan aparejada comisión en muchos casos.
Partimos de la base que utilizamos como herramienta Mynode y BTCPAY SERVER incluido en el paquete Mynode.
Una solución artesanal es simplemente dar a cada nuevo cliente una dirección nueva y remitirla por medios tradicionales, como correo electrónico, pero la idea es una solución automática para que cada pago vaya a una dirección nueva y así no tener que reutilizar direcciones.
El objetivo, por tanto, es poder crear botones de pago de manera fácil, con la generación de un código html que incluir en la web de forma que BTCPAY SERVER pueda interactuar con nuestro nodo local, independientemente del servidor donde esté alojada la página web donde insertemos el código.
Después de darle muchas vueltas al asunto, la clave para la solución que expongo me la dio el vídeo https://www.youtube.com/watch?v=hQxCOSgYqTo de Satoshi Radio, que me mostró el camino a seguir.
A continuación explico los pasos con los que se llega a la solución comentada. No soy informático y seguramente puede que haya otros métodos para alcanzar el objetivo marcado; con este trabajo simplemente explico el camino seguido por si pudiera ser de interés y utilidad para otras personas en situación parecida o análoga.
La idea es poder crear un botón de pago o, como más adelante se indica, un enlace para generar recibos, sobre la base del BTCPAY Server de Mynode, de forma que podamos incrustarlo fácilmente en nuestra página web (alojada en un sitio diferente al nodo de Mynode), que opere contra nuestro propio nodo de Bitcoin, y sin necesidad de instalar e integrar BTCPAY con plataformas tipo Woocommerce o similar.
PASOS A SEGUIR
Creación de la tienda en BTCPAY Server
En primer lugar, desde Mynode accedemos a BTCPAY Server y creamos una tienda. Tendremos que configurar el wallet al que asociamos la tienda para lo cual hay diferentes opciones. Una de ellas es la de introducir la llave maestra pública de un monedero cuyas claves privadas no están en el nodo o equipos a él conectados. Ello permitirá luego que para cada usuario, colaborador o cliente que pinche en el botón o enlace de pago se genere una nueva dirección no usada anteriormente, lo cual beneficia a la privacidad tanto del sitio que aloja el botón de pago como del pagador.
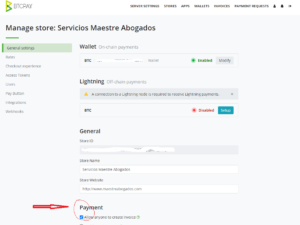
En el apartado “Payment” de “General Settings” de la tienda creada, tenemos que habilitar la casilla de “Allow anyone to create invoice”.
Imagen 5
Habilitación VPN en Mynode
En un primer momento, pensé que era necesario habilitar el acceso por VPN a nuestro nodo de Mynode (https://mynodebtc.com/guide/vpn) con la redirección de puertos (Port Forwarding) que se menciona en la guía. Así lo hice en un principio, pero, curiosamente, me he dado cuenta de que para esta solución no es necesario habilitar la VPN en Mynode, ni tampoco la redirección de puertos en el router. Todo esto de la redirección de puertos nos lo evitamos si usamos TOR, como comento al final del artículo.
Redirección de puertos de BTCPAY Server
Esta sí es una de las claves del proceso, pues es necesario hacerlo si no queremos usar TOR. Tenemos que ir a nuestro router y hacer un reenvío del puerto (Port Forwarding) 49392 ó 49393 usados por BTCPAY Server. Dependiendo de tu router eso se hará de una forma u otra. En esa redirección habrá que poner la IP local de tu nodo de Mynode de modo análogo a como se menciona en el apartado anterior. He comprobado a quitar este reenvío y entonces, como era de esperar, la cosa no funciona, salvo que usemos la opción TOR que comento más adelante.
Creación del botón de pago
Una vez hecho lo anterior, dentro del menú de la tienda de BTCPAY vamos al apartado “Pay Button” y configuramos los parámetros que queramos, como el importe de pago del botón, el tamaño de la imagen, etc.
Dándole al botón de Preview que hay al margen de la derecha, podremos comprobar si todo el proceso va por buen camino.
Uso del código HTML generado
Una vez que está todo correcto, al final de la página podemos ver el “Generate Code” que será algo como lo siguiente:
Si nos fijamos, hay 2 llamadas a …mynode.local:49392… Lo que tenemos que hacer es copiar todo el código, pegarlo en un editor de texto plano y sustituir las dos instancias de “mynode.local” por la IP pública que tenga el nodo de Mynode. Si pegamos ese código en la entrada de wordpress como esta, no sé exactamente por qué razones, la cosa no funciona bien.
[:en]In this article, I comment on my experiments with BTCPAY Server integrated in Mynode, in order to be able to easily create a payment button to integrate on our website, autonomously, without having to have third-party services, against our own bitcoin node.INTEGRATION WITH WOOCOMMERCE. SOMETHING NOT SUITABLE FOR BEGINNERS
BTCPAY advertise itself as something easy and accessible for anyone who wants to open a business accepting bitcoins without the need to resort to third parties. As of today, this objective is certainly complex, even for those who have expert-level knowledge ( https://www.sosthene.net/btcpay-bilan/ ). As far as I can see, the average user is necessarily doomed to either spend the money on a Lunanode-like hosting solution, or at best, have to resort to a DDNS service like no-ip.com ( free) and turn to friends or professionals with high knowledge in the field. Another highly recommended option would be to use the services of bitcoinheiros . For those interested in this initiative, I recommend the recent talk led by Lunaticoin , accessible on youtube .
After many attempts and hours of study, I got stuck in step 3 of this tutorial ( https://docs.btcpayserver.org/DynamicDNS/ , Configure your BTCPay docker install to provide HTTPS certificates) for which you have to go to the command line and the instructions are simply that you connect to your “instance” and run some commands, without further explanation on, for example, how to access the “instance”. If the two previous steps can be done from the graphical interface, I do not understand why they have not done the same with this third step. Maybe that’s nonsense and you really have to do it like this, but I think this should be improved.
To access mynode by ssh, I think the most operative thing to do is to do it on the “settings” page
Image 1

But there it is accessed as admin, not as root and as indicated in the BTCPAY control panel it seems that it should be accessed as root
Picture 2

If you leave it so, when trying the pairing from Woocommerce (by the way we must put the virtual domain that we have followed by “: 49392”, the BTCPAY port) we get a message saying that we must access it through https or of TOR, without instructions on how to access with TOR.
Picture 3

Anyway … After giving up on my attempt to integrate BTCPAY with Woocomerce, I started to think of some other option to, at least, use the “Pay button” that can be configured once we generate a store in BTCPAY:
Picture 4

ALTERNATIVE SOLUTION APPROACH
As we say, the idea was to create a payment button with bitcoins without the need to develop and match a store with Woocommerce or similar with our BTCPAY server, and all this, as BTCPAY is supposed to achieve, using its own means without having to resort to nodes or third-party payment button solutions that, among other things, carry commission in many cases.
We start from the base that we use as a tool Mynode and BTCPAY SERVER included in the Mynode package.
An artisanal solution is simply to give each new customer a new address and send it through traditional means, such as email, but the idea is an automatic solution so that each payment goes to a new address and thus not having to reuse addresses.
The objective, therefore, is to be able to create payment buttons easily, with the generation of an html code to include on the web so that BTCPAY SERVER can interact with our local node, regardless of the server where the web page is hosted where let’s insert the code.
After thinking a lot about the matter, the key to the solution that I present was given to me by the video https://www.youtube.com/watch?v=hQxCOSgYqTo from Satoshi Radio, which showed me the way forward.
Next, I explain the steps with which the commented solution is reached. I am not a computer scientist and surely there may be other methods to achieve the goal set; With this work, I simply explain the path followed in case it could be of interest and utility for other people in a similar or analogous situation.
The idea is to be able to create a payment button or, as indicated below, a link to generate receipts, based on Mynode’s BTCPAY Server, so that we can easily embed it on our website (hosted on a site other than the node de Mynode), which operates against our own Bitcoin node, and without the need to install and integrate BTCPAY with Woocommerce or similar platforms.
STEPS TO FOLLOW
Store creation in BTCPAY Server
First, from Mynode we access BTCPAY Server and create a store. We will have to configure the wallet to which we associate the store, for which there are different options. One of them is to enter the public master key of a wallet whose private keys are not in the node or equipment connected to it. This will then allow each user, collaborator or client who clicks on the payment button or link to generate a new address not previously used, which benefits the privacy of both the site that hosts the payment button and the payer.
In the “Payment” section of “General Settings” of the store created, we have to enable the “Allow anyone to create invoice” box.
Picture 5

Enable VPN in Mynode
At first, I thought it was necessary to enable VPN access to our Mynode node ( https://mynodebtc.com/guide/vpn ) with the port forwarding mentioned in the guide. I did so in the beginning, but, curiously, I have realized that for this solution it is not necessary to enable the VPN in Mynode, nor the port forwarding in the router. We avoid all this port forwarding if we use TOR, as I comment at the end of the article.
BTCPAY Server port forwarding
This is one of the keys to the process, as it is necessary to do so if we do not want to use TOR. We have to go to our router and do a port forwarding (Port Forwarding) 49392 which is the one used by BTCPAY Server. Depending on your router, this will be done in one way or another. In this redirection, you will have to put the local IP of your Mynode node in a similar way to that mentioned in the previous section. I have tried to remove this forwarding and then, as expected, the thing does not work, unless we use the TOR option that I comment later.
Create the payment button
Once this is done, within the BTCPAY store menu we go to the “Pay Button” section and configure the parameters we want, such as the button payment amount, the size of the image, etc.
By clicking the Preview button on the right side, we can check if the whole process is on the right track.
Using the generated HTML code
Once everything is correct, at the end of the page we can see the “Generate Code” that will be something like the following:
If we look at it, there are 2 calls to… mynode.local: 49392… What we have to do is copy all the code, paste it into a plain text editor and replace the two instances of “mynode.local” with the public IP that it has. the Mynode node. If we paste that code in the WordPress input like this, I don’t know exactly for what reasons, the thing does not work well.


Hola amigo.
Esto te funcionó con pagos de LN también?
No lo he probado. Con LN sería más complicado, sobre todo si quieres hacerlo sin depender de terceros.